
REVIEW · KOREA
South Korea eSIM (3-30 days. Up to 45GB)
Internet on arrival can save your trip. This South Korea eSIM from Xplori is interesting because it arrives by email, you activate it with a QR code, and you get data fast for getting around Seoul and beyond with less hassle than a physical SIM. I like that it’s built for 4G/5G use where available and that it aims to keep you connected at local rates.
Two things I really like: first, the setup is straightforward, so you do not have to swap SIM cards or hunt for a shop after landing. Second, the service is designed to connect you to the best available local network automatically, and the results people describe include strong reliability even on a Seoul to Jeju style trip. That means you can plan, message, map, and stream without constantly thinking about your connection.
One drawback to consider: you need an eSIM-compatible phone, and high-speed data is capped (after that, speed switches to 3G). Also, the offer text contains an odd line about Canadian provinces, so I strongly suggest you double-check that your specific plan is intended for South Korea before you pay.
In This Review
- Key points before you buy
- What this eSIM experience is actually like
- Picking the right duration: 3 days vs 30 days
- Before you go: make sure your phone is ready for eSIM
- The setup stage: email delivery and QR activation
- Arrival day in Seoul: turn on roaming data correctly
- Using it around Seoul: the practical benefits
- Beyond Seoul: day trips like Jeju Island
- Data limits and the 3G speed drop: plan like a grown-up
- Customer service that does not waste your time
- Value for the price: why $5 can make sense
- Who this eSIM is best for
- Quick itinerary-style walkthrough (how your days unfold)
- Stage 1, Order and receive your eSIM
- Stage 2, Activate with the QR code
- Stage 3, Land and enable the eSIM
- Stage 4, Use your data around Seoul
- Stage 5, Take your day trips
- Stage 6, When your plan ends
- Should you book this eSIM?
- FAQ
- Does this eSIM work on any phone?
- How do I get the eSIM after booking?
- How long does the eSIM last?
- What happens if I use more data than included?
- How do I activate it when I arrive in South Korea?
- What is the cancellation policy?
Key points before you buy
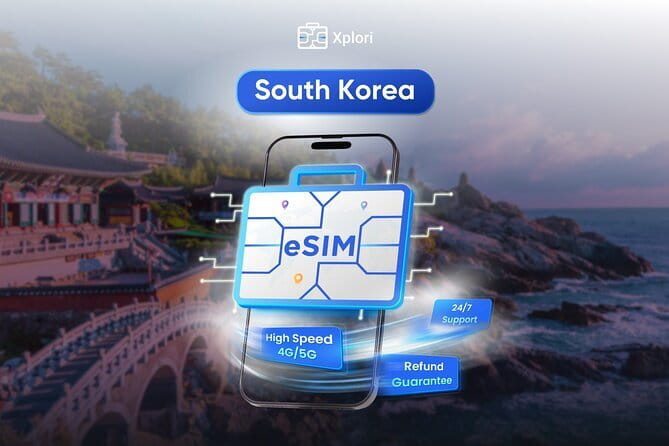
- Email delivery, QR activation in minutes so you are not stuck in line after landing
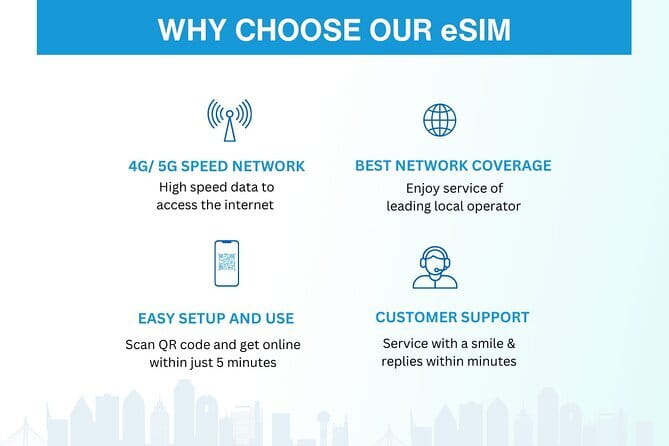
- 4G/5G where available for fast maps, messages, and streaming
- Up to 45GB depending on your selected duration, with a speed drop to 3G after the cap
- Remote customer service by email if something does not activate as expected
- Auto-network behavior designed to give you the best signal on the ground
Torn between options? The Seoul trips below held up best on our read.


What this eSIM experience is actually like
Think of this as a “data insurance policy” for your trip. Instead of buying a SIM at the airport, you pre-buy a digital connection, then activate it once you are ready. That difference matters, because jet lag plus language barriers plus a long airport line is not a fun combination.
You are getting mobile data for 3 to 30 days, with an option listed up to 45GB. The idea is simple: enough speed for real travel use, and enough staying power for a longer Seoul trip or day trips without hunting for Wi-Fi every time you move neighborhoods.
Also, you are not choosing a meeting point or waiting for anyone. This is fully digital, so the “where do we meet” problem disappears. Your only job is to have a phone that supports eSIM and to activate in the right way.
Picking the right duration: 3 days vs 30 days
The plan choices are 3 to 30 days. That range is useful because Seoul trips can be short and packed, or long and slow.
If you are in Seoul for just a few days, you mostly care about navigation, messages, and ride-hailing or subway alternatives. If you are there for a couple of weeks, streaming and video calls can creep in, and then the data cap becomes your main concern.
Here is the practical way to choose:
- Short trip: prioritize enough data for maps and everyday use, and do not buy a huge plan you will not use.
- Long trip: pick the longer duration to avoid hitting the speed cap too early. Once you hit the limit, the service drops to 3G speed, which is fine for basic messaging but not as smooth for video.
Before you go: make sure your phone is ready for eSIM
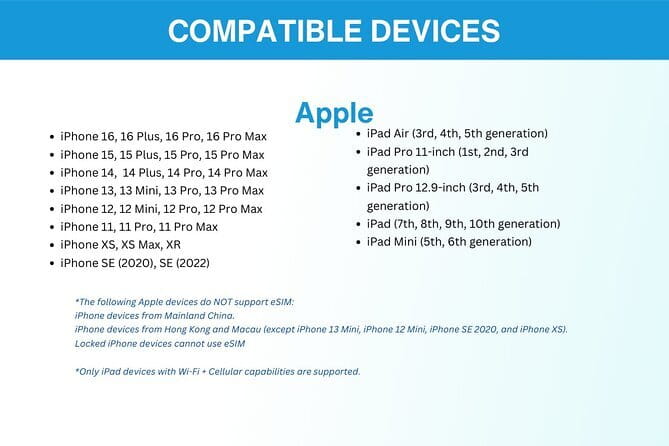
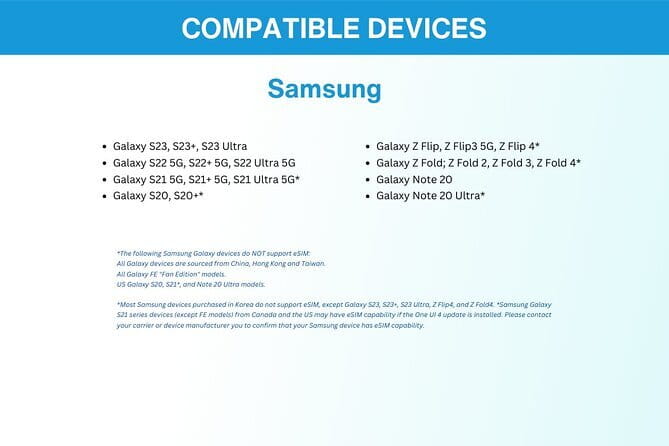
This product depends on eSIM support. The offer lists examples like iPhone XS and later, Pixel 3 and later, and Samsung S20, S21, and Fold. That covers a lot of modern phones, but it still means you should verify your exact model.
Before you order, check two things:
- Your phone model supports eSIM
- You can add an eSIM profile (not just “it has eSIM,” but that it can actually be installed)
If you are unsure, the provider invites you to contact them ahead of time. That is worth doing. Getting stuck with “my phone does not support eSIM” after you land is avoidable.
The setup stage: email delivery and QR activation
The flow is designed to be low-stress:
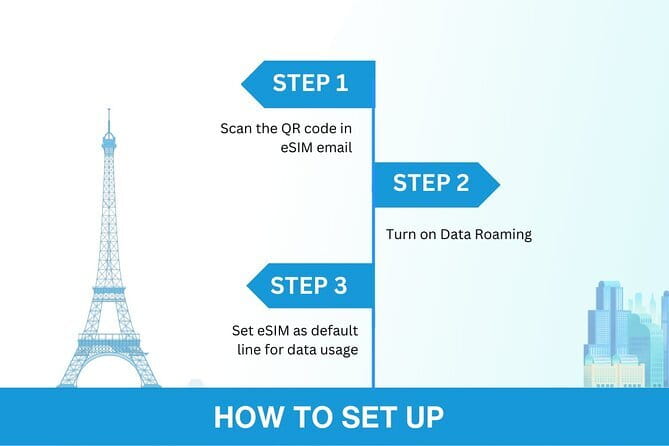
- You order, then receive the eSIM by email
- You scan the QR code to activate the eSIM profile
- You should be connected within minutes
This matters because your first day in Seoul often includes a lot of “small tasks” that depend on data: checking station exits, confirming times, translating signs, and sending updates to friends or family.
One practical tip from real-world activation issues: if the connection does not fully take hold right away, people report that restarting the device can help complete the activation. If you hit a snag, try that before you panic and before you give up on the QR step.
- Best DMZ Tour Korea from Seoul (Red Suspension Bridge Optional)
★ 5.0 · 41,422 reviews - DMZ Tour: 3rd Tunnel, Option(Suspension Bridge, Boat) from Seoul
★ 5.0 · 21,373 reviews - DMZ tour south Korea from Seoul (NK experience hall, defector)
★ 5.0 · 20,599 reviews - Seoul: DMZ Tour with Optional Suspension Bridge
★ 4.8 · 5,277 reviews - Signature DMZ Tour: Exclusive Defector Talk & Suspension Bridge
★ 5.0 · 4,459 reviews
Arrival day in Seoul: turn on roaming data correctly
Once you land, your eSIM still needs the right setting turned on. The key phrase in the instructions is about turning on data roaming, meaning you need to enable the cellular data switch for the eSIM profile so it actually uses the new connection.
So your arrival-day checklist looks like this:
- Install and activate the eSIM profile using the QR code you received
- Enable the eSIM data profile
- Turn on data roaming if prompted, then confirm your connection
After that, the service is designed to connect automatically to a local network. One of the best parts of eSIM products when they work is that you stop thinking about signal bars and start thinking about sightseeing.
Using it around Seoul: the practical benefits
When your data is working well, Seoul feels easier. That is not a vague claim. It shows up in concrete moments.
Here is what you will likely use most:
- Transit and walking directions with live map updates
- Messaging with home (often via apps that need data)
- Checking restaurant hours or last-minute plan changes
- Translation for signs, station announcements, and menus
The service is marketed as local-rate data and supports 4G/5G where available. In plain terms, that means you should expect speeds that handle normal travel tasks without waiting. People also describe fast enough connections for streaming and video calls, which is important if you need to stay connected for work or you just want to share what you see.
Beyond Seoul: day trips like Jeju Island
Even if you base yourself in Seoul, South Korea travel often spills into day trips. The biggest “real test” is whether your data keeps working when you leave the core metro area.
One of the most compelling signals from the experience described is that it worked reliably on a Seoul to Jeju island style trip. That is exactly what you want your eSIM to handle: not just your starting city, but the places you actually add to your schedule.
That said, always remember that cellular networks can vary by location. So if your itinerary includes rural stretches, mountains, or ferries, you might find signal more variable than in a big city. The good news is that your fallback option is still basic messaging even if speed later slows.
Data limits and the 3G speed drop: plan like a grown-up

The offer says high-speed data is capped at the mentioned amount, then speed switches to 3G after you use it. This is normal for most travel data plans, but you should plan for it.
A few practical ways to protect your high-speed allowance:
- Use Wi-Fi for big downloads at your hotel when available
- Stream on lower quality when you are near the cap
- Save video calls for when you have a stable plan, not when you are out all day
What 3G means in reality depends on what you do. For navigation and messaging, it can still work fine. For smooth streaming, it can get slow enough to be annoying. If your trip includes a lot of video or live posting, longer durations usually feel better because you hit the cap later.
Customer service that does not waste your time
This is not a guided tour, so there is no guide waiting at a meeting point. What you do get is remote customer service by email.
That matters because your two biggest problems are technical:
- activation fails or only partially installs
- your phone does not switch properly to the eSIM profile
If that happens, email support is your route. It is also why I like that this is not a mysterious service with no back channel. Having support ready can turn a frustrating night into a quick fix.
Value for the price: why $5 can make sense
The price listed is $5.00 per person, with 20+ bookings in the last month showing solid demand. That is a low price for mobile connectivity, especially when you compare it to the usual airport SIM experience.
But value is not just the price tag. It is the time you save and the friction you avoid:
- no airport SIM line
- no wrestling with a shop clerk and a language mix
- no hunting for the right plan right after a flight
If you are the kind of traveler who likes to land and immediately get moving, an eSIM like this is often cheaper in the real-life sense. Not because data costs less everywhere, but because your time is worth something.
Also, the price point works best when your plan duration matches your trip length. If you buy too little, you will hit the cap early. If you buy too much, you pay for speed and data you might not use.
Who this eSIM is best for
This experience fits specific travel styles better than others.
You will love it if:
- you want an easy connection from the moment you land
- your phone supports eSIM
- you rely on maps and messaging apps daily
- you travel with family or friends and want everyone connected quickly
- you prefer not dealing with airport SIM counters
It might be less ideal if:
- you do not have an eSIM-compatible phone
- you are very data-heavy with lots of streaming and video calls every day
- you need total certainty and hate any chance of activation issues (in that case, build in time to troubleshoot on Day 1)
Quick itinerary-style walkthrough (how your days unfold)
Since there is no physical meeting or guided route, think of the “itinerary” as stages.
Stage 1, Order and receive your eSIM
You purchase, then get the eSIM profile by email. This is the most quiet part of the experience, and it is the reason you feel prepared instead of scrambling after landing.
Stage 2, Activate with the QR code
You scan the QR code and install the eSIM profile. If it does not fully connect at first, you can fix activation with a device restart, then try again.
Stage 3, Land and enable the eSIM
On arrival, you turn on data roaming and enable the cellular profile. Once that is done, you should connect within minutes.
Stage 4, Use your data around Seoul
You use your connection for maps, messages, and quick travel decisions. With 4G/5G where available, day-to-day use should feel smooth.
Stage 5, Take your day trips
If you venture beyond Seoul, like a Jeju side trip, the connection is expected to stay functional. Signal strength may vary by area, but the service is designed for real travel movement.
Stage 6, When your plan ends
When the selected duration ends, you stop using the eSIM data profile. You might keep the eSIM stored on your phone, but you will not have active data unless you add another plan.
Should you book this eSIM?
Yes, if you meet the main requirement, your phone supports eSIM, and you want a simple way to stay connected in South Korea without airport stress. The main value is fast activation, local-rate-style data use, and the fact that it is meant to connect automatically to the best local network.
You should reconsider if you are worried about activation compatibility, you are unsure which plan applies to South Korea versus any confusing regional wording, or you expect extremely heavy streaming every day for the whole trip. In those cases, double-check your phone settings and confirm the plan details before you buy.
FAQ
Does this eSIM work on any phone?
No. Your phone must support eSIM. The offer lists examples such as iPhone XS and later, Pixel 3 and later, and Samsung S20, S21, and Fold. If you are not sure about your model, the provider says to contact them in advance.
How do I get the eSIM after booking?
You receive the eSIM by email after your order. Then you scan the QR code from that email to activate the eSIM profile.
How long does the eSIM last?
You can choose a duration from 3 to 30 days, based on your trip length.
What happens if I use more data than included?
High-speed data usage is capped at the amount listed for the plan. After that, data speed switches to 3G.
How do I activate it when I arrive in South Korea?
After you install and activate the eSIM profile using the QR code, you should turn on your data roaming and enable the data connection for the eSIM. If activation feels incomplete, restarting your device can help.
What is the cancellation policy?
Free cancellation is offered. You can cancel up to 24 hours in advance for a full refund. If you cancel less than 24 hours before the experience’s start time, the amount paid is not refunded.
More Seoul Write-Ups




Fresh on the Seoul pile
- Unique Native Experience : Han River Picnic, Board game, BBQ★ 5.0 · 3 reviews
- 2-Hour Private Kayaking and Paddleboarding Experience in Hanriver★ 5.0 · 3 reviews
- Korean Folk Village & Suwon Hwaseong Fortress Private Tour★ 5.0 · 3 reviews
- Seoul Korean BBQ Dinner Experience with Secret Food Tours★ 5.0 · 3 reviews
- Seoul Highlights & Hidden Gems – Private Tour with Photo Service★ 5.0 · 3 reviews
- Night Food Tour in Seoul with Traditional and Modern Cuisine★ 5.0 · 3 reviews